This section explains how to operate the air purifier using either the device control panel or the Aliencell X1 touchscreen, and how to establish the necessary connections.
¶ 1.Startup
Before operation, please ensure the device is powered on:
| Flip the power switch on the back of the purifier tothe ON position |
Tap the Power button on the purifier's control panel |
¶ 2. Method 1: Control the Air Purifier via the Control Panel
You can manually adjust the airflow or switch modes directly using the touch buttons on the purifier.
¶ 2.1 Manual Fan Speed Adjustment
Tap the Manual Speed Button ![]() to cycle through speeds.
to cycle through speeds.
- Gear 1 / Gear 2: Recommended for Engraving. These modes provide sufficient suction for light smoke while maintaining lower noise levels.
- Gear 3: Recommended for Cutting. Cutting materials (like wood or acrylic) generates heavy smoke; use the highest speed to ensure effective extraction.
¶ 2.2 Auto Mode
Cycle until the Auto icon ![]() lights up.
lights up.
- Requirement: The purifier must be connected to the laser engraver via data cable or Bluetooth.
- Function: The purifier automatically syncs with the laser engraver—starting, stopping, and adjusting airflow based on the machine's working status.
¶ 3. Method 2: Control the Air Purifier via the Aliencell X1 Touchscreen
Once connected, you can remotely control the purifier and monitor filter health directly from your Aliencell X1 interface.
Prerequisite: Ensure the purifier is connected via Wire or Bluetooth (see Section 4 below).
¶ 3.1 Accessing the Air Purifier Control Interface
- On the Aliencell X1 touchscreen, tap the ... icon in the bottom right corner.
- Select Purifier, and the air purifier control panel will pop up.
¶ 3.2 Controlling Fan Modes
The interface provides fan speed controls and shows the real-time status of all 5 filters.
¶ 3.2.1 Fan Speed Control
- The purifier control panel offers 5 fan speed settings. Tap the corresponding icon on the touchscreen to switch the device to that speed mode immediately.
¶ 3.2.1 Filter Life Monitoring
Displays the remaining life (%) of all 5 filter layers in real-time to help you plan maintenance:
- Filter 1 - Filter 5 (e.g., 99%)
- After setup, tap the Confirm button to save settings and apply changes.
¶ 4. Establishing Connection
To enable Auto Mode and X1 touchscreen control, connect the purifier to your laser engraver using one of the following methods.
¶ 4.1 Method 1: Wired Connection
The most stable connection method.
- Connect the purifier to the laser engraver using the included Mini-B data cable.
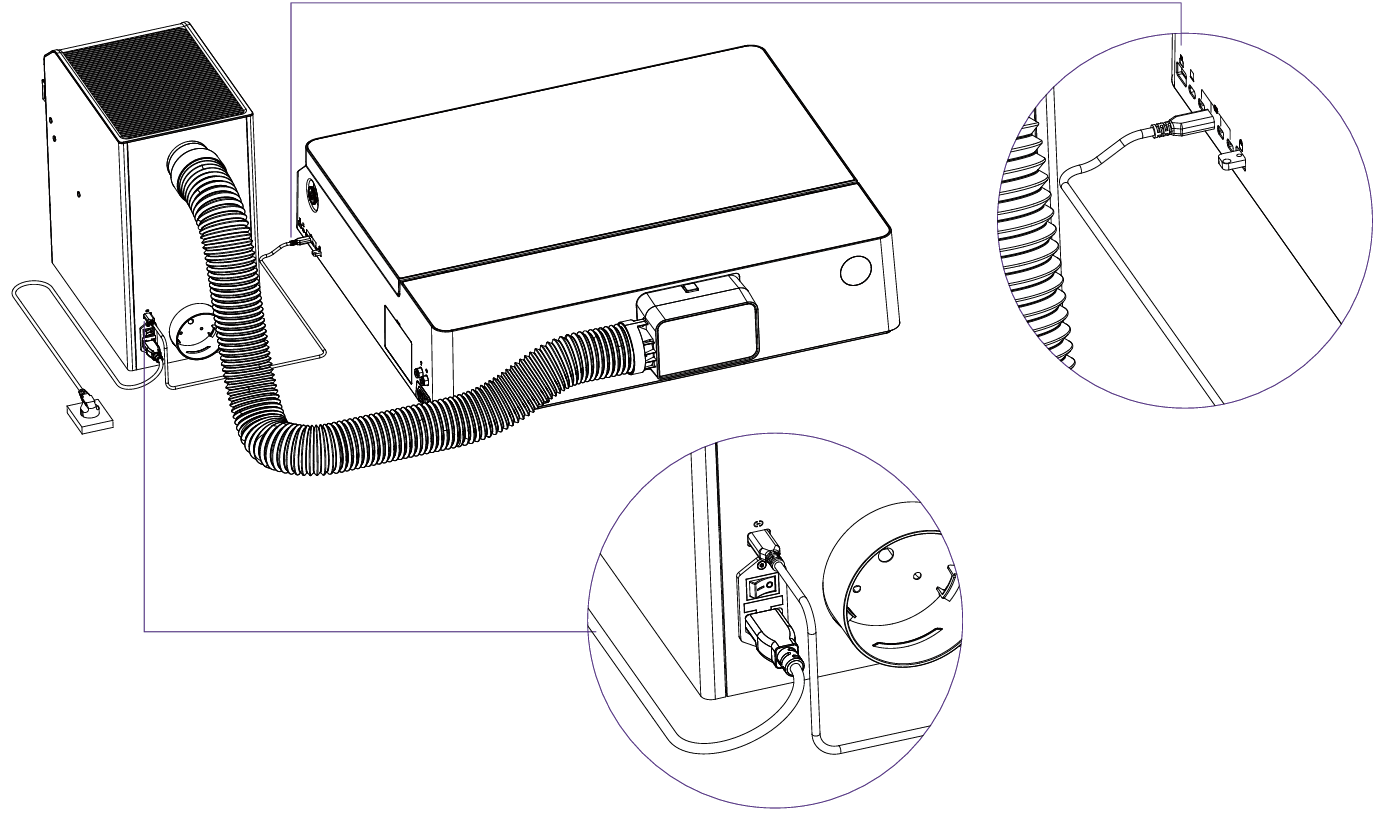
- Upon successful connection, the Connection Icon on the purifier screen will turn solid.

- Communication is now established.
¶ 4.2 Method 2: Bluetooth Connection
For wireless setup.
¶ 4.2.1 Activate Purifier Pairing
- Tap the Bluetooth button
 on the purifier panel.
 - The Bluetooth icon on the screen will start flashing, indicating it is waiting for a connection.
¶ 4.2.2 Pair Bluetooth on Aliencell X1 Touchscreen
- Tap the Aliencell X1 touchscreen and navigate to Settings > Bluetooth.
- Turn on Bluetooth and tap the ↺ Refresh button in the top right corner to scan for devices.
- Select the device named "AC_AirPxxxxx" to connect.
The numbers in the Bluetooth name match the last 5 digits of the SN code on the label at the back of the purifier.

- Once connected successfully, the Bluetooth icon on the purifier screen will stop flashing and remain solid.
